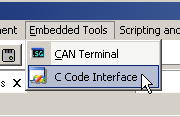
Getting to the C Code Interface view in Vehicle Spy.
Overview
The C Code Interface is a way to write C code that interacts with the communication protocols Vehicle Spy works with. The main advantage of using C code with Vehicle Spy as opposed to straight C code is that your code reuses of the all the features of Vehicle Spy. Just some of the small examples are message decoding, message reception, database decoding, display of signals and buffer capturing. The C Code Interface supports both event based and procedural step-by-step type C coding.
Using the C Code Interface in Vehicle Spy
The C Code Interface is available from the "Embedded Tools" menu in Vehicle Spy. This will open the C Code Interface view. The view consists of two main parts : a list of C code projects and an output window. Vehicle Spy supports many C code projects at once so you can add and remove projects to the list. The output window will display text written with printf in the C code project. You can also open the C code project by clicking the "Open Project in Visual Studio" button. When Vehicle Spy starts - all C code projects enabled (with a check box) will run.

Getting to the C Code Interface view in Vehicle Spy.
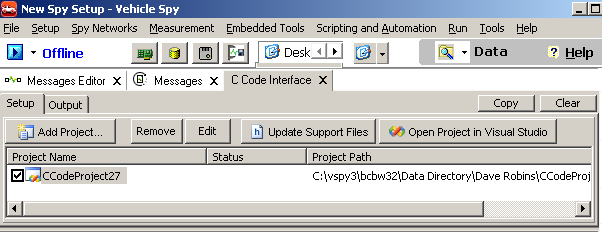
The C Code Interface in Vehicle Spy.
Design philosophy of the C Code Interface
Instead of designing a proprietary scripting language that is C like, the C Code Interface uses standard C. Also, instead of a custom design environment or IDE we take advantage of the most powerful environment designed : Visual Studio (http://www.microsoft.com/express/vc/). The Visual Studio environment provides the most powerful development and debugging environment for C code today. The C Code Interface is designed to support the express edition or better.
To make the C Code Interface work for the non-windows programmer, the C Code Interface automatically generates the projects and support files you need to interact with Vehicle Spy. Therefore, the typical C programmer who understands the basics can be very productive in this environment.
The automatically generated code was designed for developer productivity. So, features like the Visual Studio intellisense works well to automatically find database messages, Vehicle Spy API's, and application signal environmental variables.
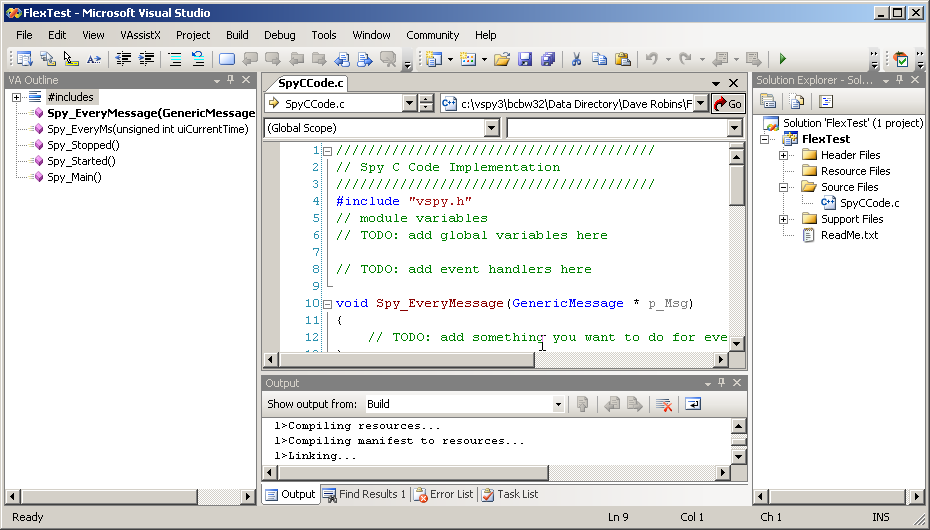
Visual Studio is a powerful IDE for developing and debugging C code.
Requirements
You must have Visual C++ installed. Currently, Visual Studio 2008 or 2005 are supported - express, standard or professional. The express edition is a free download from the Microsoft web site : http://www.microsoft.com/express/vc/. The Visual Studio express edition is not as functional for debugging as the standard version and above (see debugging for details). Vehicle Spy version 414 and above supports the C Code Interface. Please note that Visual Studio does not have to be installed to run C code projects that are already built.
Protocol Support
The C Code Interface fully supports the CAN protocol. There is parital supports for all protocols when working at the signal level. The main difference is that working at the bit and byte level of the other Vehicle Spy protocols is not supported. So, for example, receiving a message event for J1850 message works but the MessageData strucutre is not filled in. The signals are filled in - however. In the future the C Code Interface will support more protocols. Contact our technical support if you have requirements for other protocols.
Example Videos
Please review the example videos for an overview on how to use the C Code Interface.
Adding a New Project
To add a new project, click on the the "Add Project..." button. When you do this, a drop down will appear. Here you will have to option to add a new project or add an existing project.
If you add a new project, you will see the Add new C code project window. Here you can type a name for the project and a description. Then, Vehicle Spy will create your new project and launch Visual Studio. After this you can edit the project to setup event functions or simply edit the code in Visual Studio. Make sure you build the DLL once before starting Vehicle Spy, otherwise, you will not have anything for Vehicle Spy to load - this will result in an error.

Adding a new C code project in the C Code Interface view
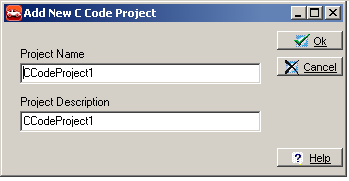
You need a project name and description to create a new project.
Editing a Project
After a new project is created, you can edit it by clicking the "Edit" button in the C Code Interface. In the setup dialog you can add event functions and change the name and description of the project. For setup of the event functions, please see the following sections for message, application signal and timer events. If you create event functions, please make sure to manually copy the event handler code to your SpyCCode.c file. This will help you avoid a linker error when building your project.

The edit button will allow you to edit your C code project including adding event functions.
Your work goes here: SpyCCode.c
The most important file in the Visual Studio project is the SpyCCode.c file. This file is where the C code you write is placed. In this file, you can implement all the event functions and the Spy_Main() function. This file includes "vspy.h", which defines all the messages in your Vehicle Spy project. See the screen shot below.
Note Advanced users can separate their project in to as many C files they would like. This is recommended for very large projects. The SpyCCode.c file is the default C file and works well for small projects and beginners. So, if you know what your doing in Visual Studio and want to have a separate C file for every event for better organization - go for it! In the end its all just C.

The SpyCCode.C implementation file
Automatically generated files: vspy.c and vspy.h
Vehicle Spy automatically generates two files from your current Vehicle Spy setup. These include a header file (vspy.h) and an implementation file (vspy.c). These files can become inaccurate as you make changes to your Vehicle Spy setup. So, you will need to regenerate these as necessary during your development. You can do this by clicking on the "Update Support Files" button in the C Code Interface view in Vehicle Spy. These files will also be automatically updated every time you edit the C code project within Vehicle Spy.

Clicking update support files will update the vspy.c and vspy.h files
Functions and Events to Work with Message Objects
All message objects in the messages table, transmit table and database are represented by message structures. Since this is C the structures are empty by default. To use them you must initialize them by calling a init function. All these functions and structs are defined in the vspy.c/.h files. For event messages the generated C code calls the init function and passes you a pointer to the structure already filled.
The names of the message structures are the same as the message names with a prefix. For database messages, the prefix is "DB_". This prefix helps to quickly find the message you want with the intellisense features of Visual C++. Messages defined in the message editor have the prefix "MG_". Transmit Messages defined in the messages editor have the prefix "TX_".
All functions related to the structure have the same name as the struct except they have a description of the function append to them. Currently ,there are 3 functions : Init, ClearStats and Transmit. Init sets up the structure and Transmit sends it out on the bus. ClearStats clears the statistics associated with the message.
_Init - Fill the the message with the current values including statistics.
_Transmit - Transmits the message (will return 0 if there was no room in the transmit buffer - otherwise returns one)
_ClearStats - Clears the statistics assocaited with the message
For Transmit messages defined in the transmit table, there is an additional tranmit API called _TransmitFast(). This API transmits the message as defined in the transmit table - you do not have to declare a message struct to do so. Finally, the events for the transmit message when the message has been sent successfully (this means the message you transmitted was received back from the hardware).
The generic message is a message that is not defined by the database. You can use this structure to generate a message not defined in the messages editor or database. A description of each part of the struct appears below. All messages have these properties - database messages also have these properties too. The GenericMessageTransmit() function allows you to transmit any generic message.
Database, Transmit and Receive messages all contain a Statistics structure. This structure is filled in during event functions or when you call the _Init() function. These stats can be cleared using the ClearStats api. These stats are very useful for certain types of tests such as message presense or jitter.
If a message is associated with a transport layer (ISO15765 or J1939) the event for the message will be called when the entire data packet is received. Messages which are associated with a transport layer have a larger data section than the GenericMessage. Transmission of long messages is only supportted for messages defined in the transmit spreadsheet.
Table - Generic Message properties
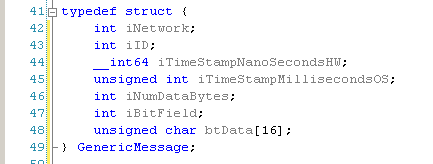 |
|
Table - Message Statistics with Transmit, Database, or Message Objects
| Name | Description |
| unsigned char btPresent |
if the message was received once this will be one |
| unsigned char btPresentToggle | toggles from zero to one every time message is received |
| unsigned char btMultiFrameComplete | this is one if the multiframe sequence has happend and is complete |
| double dUpdateRateRel | the periodic update rate in seconds |
| double dUpdateRateAbs | the absolute update reate in seconds |
| int iPerSecond | how messages per second are coming out |
| int iCount | count of how many messages have come out |
| int iChangeCount | count of how many times a message changed |
| double dStartTime | the time difference between the first two times this message was sent |
| double dMsgMinTime | the minimum time difference between two consecutive messages |
| double dMaxTime | the maximum time difference between two consecutive messages |
| double dMeanTime | the average time difference between all messages |
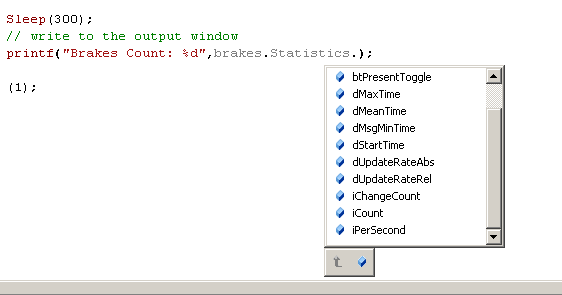
Very useful for testing - Message Statistics are part of every received message.
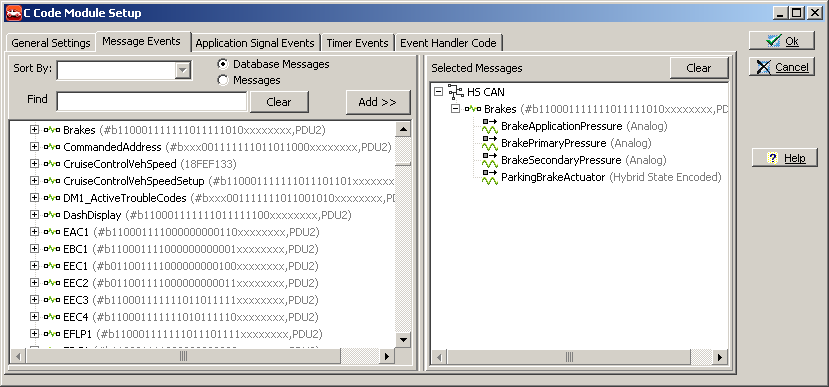
The message events are created on the "Message Events" tab.

The message event passes a pointer to the message structure all filled in.
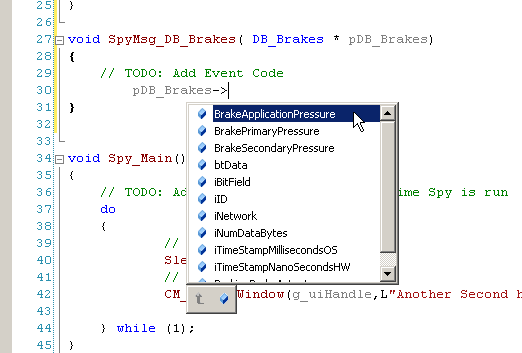
In Visual Studio, the intellisense of the IDE generates a list box allowing you to pick message signals or generic properties.
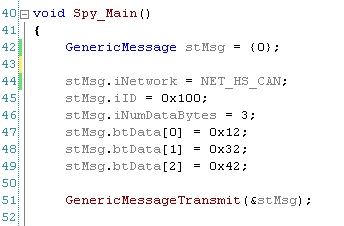
Here we have a code snippet that transmits a generic message.
Functions and Events to Work with Application Signals
Application signals are variables used in Vehicle Spy to share data between various objects in Vehicle Spy. Function block scripts and graphical panels can use these variables as well. The C Code Interface has support for accessing and changing these values. All application signals defined in your vs3 file has a set function, a get function, and an optional event function. The set and get functions set either a number, normal text, or unicode (wide text). All application signals start with the "AS_" prefix.
For the event function, you can add these to your project setup by selecting the "application signal events" tab in the setup for the C code Module (See Figure Below). Here, you can select any of the application signals for an event. This means Vehicle Spy will automatically call these functions when the application signal changes. Make sure to not use the _Set function of the application signal in the change event to avoid a cascading situation.
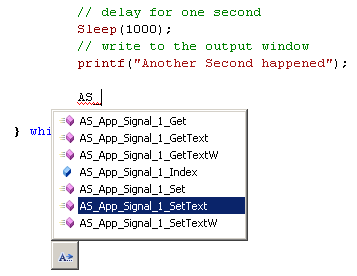
Application Signal Functions allow you to interact with app signals.

Application Signal Events are called whenever an application signal changes

The event for an application signal passes the value back as a double.
Functions and Events to Work with Timers
Timers generate events at specific time. This time can be periodic or a one shot. The timer can be setup in Vehicle Spy totally or you can optionally control it with C functions. The table below shows the properties of the timer you can set in Vehicle Spy. The timer functions include the ability to read and write the current time and the ability to enable the timer.
Table - Timer Properties that can be configured in Vehicle Spy
| Property | Description |
| Name | Name of the timer in C code |
| Description | Description of what the timer does |
| Type | Periodic or One shot |
| RunAtStart | Should the timer run when Vehicle Spy Starts |
| Inital Period | The period of the timer when Vehicle Spy Starts |
| Resolution | Millisecond or Microsecond timer resolution |

Timer Functions to control the timer using C code
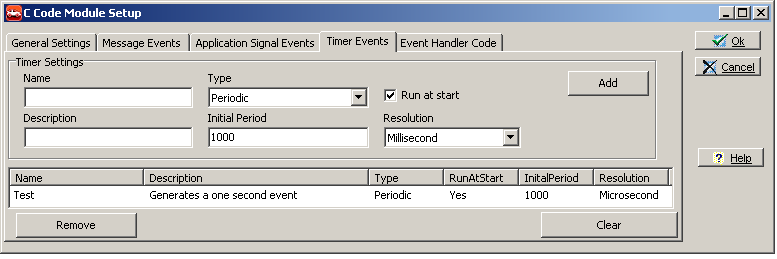
The Timer Events tab allows you to create a timer event at regular or single shot intervals.

The timer event is a simple function with no arguments that is called when the timer expires.
Functions and Events for every C code Implementation
There are certain functions for every C code module. Implementation of any of these is optional. All are event functions except for Spy_Main(). Spy_Main is like the main function of a standard C program. You can write your code as you would a separate application.
If you decide to share global data between the event functions and the main function you must use two functions called Spy_Lock() before you access a variable and Spy_Unlock() after you are done. These functions make sure the application that calls the events doesn't interfere with the Spy_Main() application. It is important that the called Spy_Lock is shortly followed by the unlock call. If you call the lock functioin without calling unlock it can lock up Vehicle Spy.
| Function Name | ||
| Spy_EveryMessage | Called for every message received | Argument: A pointer to a generic message structure. |
| Spy_EveryLoop | Called every Vehicle Spy main loop | Argument: A unsigned int indicated the current OS millisecond timestamp |
| Spy_Stopped | Called when Vehicle Spy is stopped | |
| Spy_Started | Called when Vehicle Spy is started | |
| Spy_Main | Called when Vehicle spy is run | Runs as a separate program allowing non-event based code. |
| Spy_BeforeStarted | Called before Vehicle Spy starts (allows abort of start) | Allows you to return 0 to stop Vehicle Spy from starting |
| Spy_ErrorFrame | Called for a CAN error frame on a CAN network | Arguments: Network, CAN error counters, and an Error bitfield |
| Spy_ErrorState | Called when the error state changes for a CAN network | Arguments: Network, CAN error counters, and an Error bitfield |
| Spy_KeyPress | Called for every key press | Key Pressed and the Alt, CTRL state field MUST USE THE UPPER CASE VERSION OF KEY PRESS |
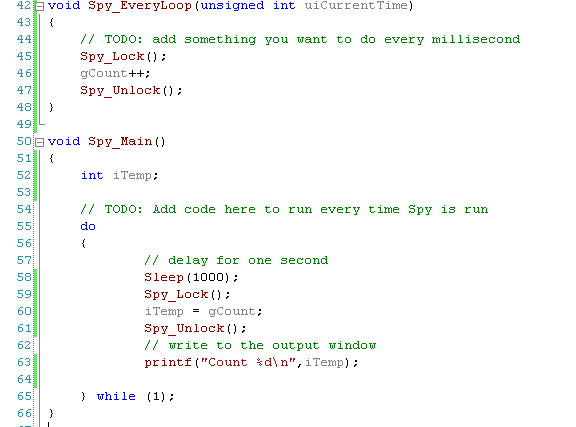
The Spy_Lock() and Spy_Unlock() functions allow Spy_Main to share data with event functions.
Functions to Control Graphical Panels
There are two functions that allow you to switch the current panel in a graphical panel. These are SpyShowPanel and SpyShowPanelW. These function take two strings. The first string is the window name and the second is the panel you wish to show. The window string can be NULL or blank and the function will operate on the first graphical panel window visible. The difference between ShowPanel and ShowPanelW is that ShowPanelW take unicode characters.
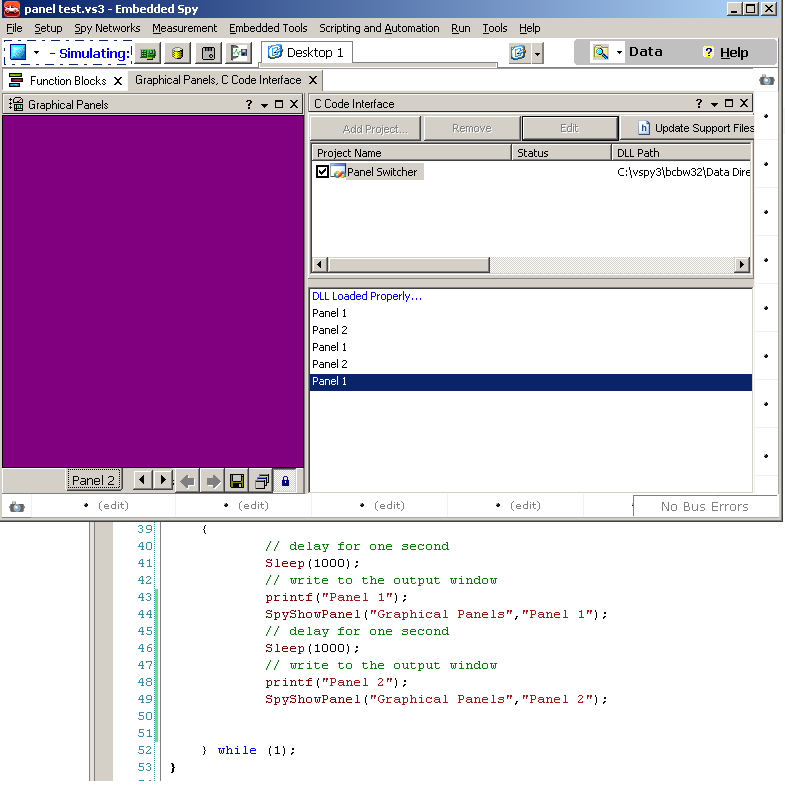
The SpyShowPanels API allows you to change the graphical panel dynamically.
Functions to Control and Monitor Diagnostic Jobs
The C Code Interface provides functions for interacting with Vehicle Spy Diagnostic Jobs. Diagnostic Jobs perform diagnostic operations on ISO14229, GMLAN or Keyword 2000. You can start, stop, save data, and see high level results directly from C.
All diagnostic job related functions begin with the prefix "DG_". The function then contains the diagnostic job name and finishes with the API name. For example, if a diagnostic job was named "Test", the function to start it would be "DG_Test_Start()". See the table and picture below for more details.
Table - Diagnostic Job APIs available
| API | Description |
| IsRunning() | Returns 1 if the diagnostic job is running |
| IsSuccessful() | Returns 1 if the diagnostic job is triggered |
| NumMessagesCollected() | Returns the number of messages collected by the diagnostic job |
| Save() | Saves the diagnostic job data |
| Start() | Starts the diagnostic job |
| Stop() | Stops the diagnostic job |
| ECUResponseCount() | Returns the number of responses from ECUs |
| TotalTimeAbs() | The total time it took for the diagnostic job to complete |
| Last7FSubFunctionEx78() | The last 0x7F (negative response) that wasn't a response pending request |
| 7FCountEx78() | This is the count of 0x7F negative responses excluding the pending requests |
| 7FCountResponsePending() | This is the count of 0x7F 0x78 response pending requests |
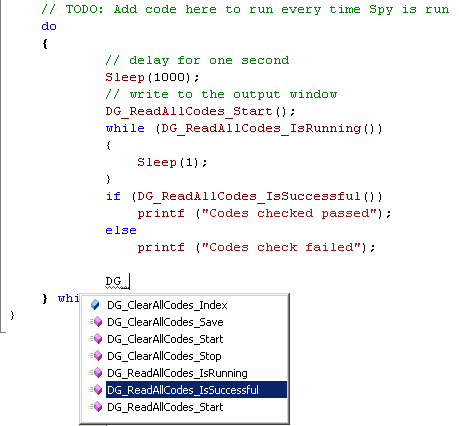
Diagnostic Job APIs allow you to control your diagnostic Jobs from C
Functions to Control and Monitor Function Blocks
The C Code Interface provides functions for interacting with Vehicle Spy Function Blocks. Function blocks can capture message data to a file, replay messages or execute a script. Therefore your C code has high level control over this powerful part of Vehicle Spy. You can start, stop, trigger or save data related to function blocks directly from C.
All function block related functions begin with the prefix "FB_". The function then contains the function block name and finishes with the API name. For example, if a function block was named "Test", the function to start it would be "FB_Test_Start()". See the table and picture below for more details.
Table - Function Block APIs available
| API | Description |
| IsRunning() | Returns 1 if the function block is running |
| IsTriggered() | Returns 1 if the function block is triggered |
| NumCollected() | Returns the number of messages collected by the function block |
| Save() | Saves the function block data |
| Start() | Starts the function block |
| Stop() | Stops the function block |
| Trigger() | Triggers the function block |
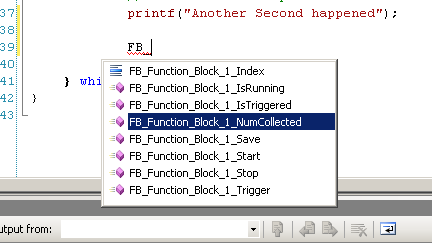
The C code project has full control of Vehicle Spy's function blocks - Just type "FB_"
Using the Text API to control all of Vehicle Spy
Vehicle Spy can be automated with the Text API. The Text API is a text based command and control API that allows every part of Vehicle Spy to be changed or queried with text. Please see the IntrepidCS API documentation for more information on the Text API. There are two APIs that give you access to the text API: Spy_TextAPI() and Spy_TextAPI_W().The difference is that the W uses unicode characters (Helpful for Japanese, Chinese, Korean, etc..).
These functions return a 1 (success) or 0 (failure). The most common cause for failure is that you have a command that Vehicle Spy cannot understand. Use the text api terminal in Vehicle Spy to learn how to use the text api.

The TextAPI allows you to control almost every aspect of Vehicle Spy
Working with Networks : Network Indexes and Statistics
For each network in Vehicle Spy there is a int variable. This variable is the number you use to reference a network. For example, the GenericMessage structure defined above includes an iNetwork property. This indicates what network the message is from or will be transmitted to. All network indexes begin with the prefix NET_.
Each network has statistics that you can access. You can access the statistics for a network with the GetStats function. You can reset the statistics with the ClearStats function.
Table - Statistics available for a network
| Field | Description |
| unsigned int iCount | count of messages on network |
| unsigned int iRate | messages per second |
| double dPercentUse | current bus utilization |
| unsigned int iMaxRate | maximum messages per second |
| double dMaxPercentUse | maximum bus utilization |
| unsigned int iErrorCount | number of errors on a network |
| unsigned int iTxCount | number of messages transmitted on a network |
| unsigned int iErrorRate | errors per second |
| unsigned int iTxRate | transmissions per second |
| unsigned int iTxBufferFill | Current network transmit buffer fill level. This level indicates how many bytes are in the transmit buffer. You can use this value to prevent buffer overflows. |
| unsigned int iCANTxErrCount | transmit CAN errors |
| unsigned int iCANRxErrCount | receive CAN errors |
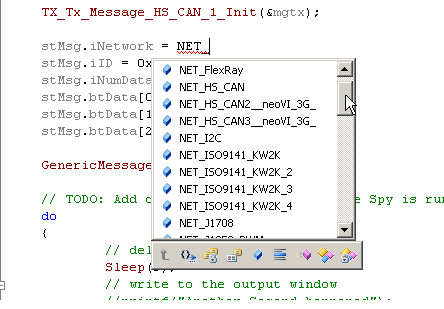
The network index variables allow you to define what network you are transmitting to or receiving from.
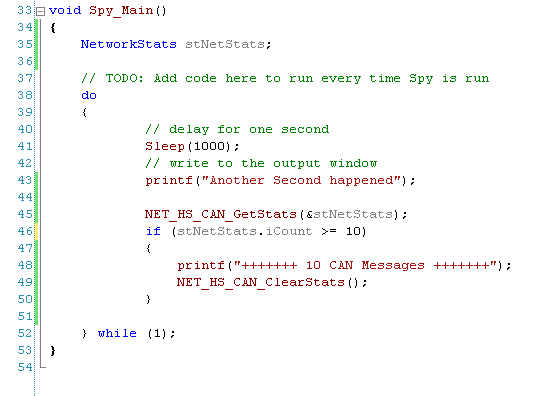
The GetStats and ClearStats API allows yout to access the statistics for a network.
The Importance of an object Name in a C code Project
After your project is built you can run it over and over. The project from that point, just like C, references every object in Vehicle Spy by name. So, if you change the name or delete an object in your Vehicle Spy setup the you use in a C project you will need to open Visual Studio and rebuild the project. This also means the C code projects can be reused across Vehicle Spy setups if you manage to keep the names the same for the objects you use.

Vehicle Spy attempts to find the objects you used in Vehicle Spy using object names but if it cannot you will get an error.
Debugging your C code
Visual Studio supports debugging two ways. First, is it will launch Vehicle Spy every time you press run. Another allows you to connect to a running copy of Vehicle Spy (called attach to process). Vehicle Spy will allow you to build and connect to it when Vehicle Spy is not online. Therefore, the most productive way is attaching to an existing Vehicle Spy. Only Visual Studio standard edition or better supports attaching to an existing Vehicle Spy.
You cannot build your project when Vehicle Spy has the C code loaded. Therefore, you must go offline in Vehicle Spy in order to fully build your project.
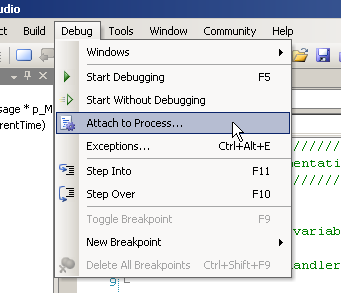
Attach to process allows you to connect to an already running copy of Vehicle Spy for debugging.
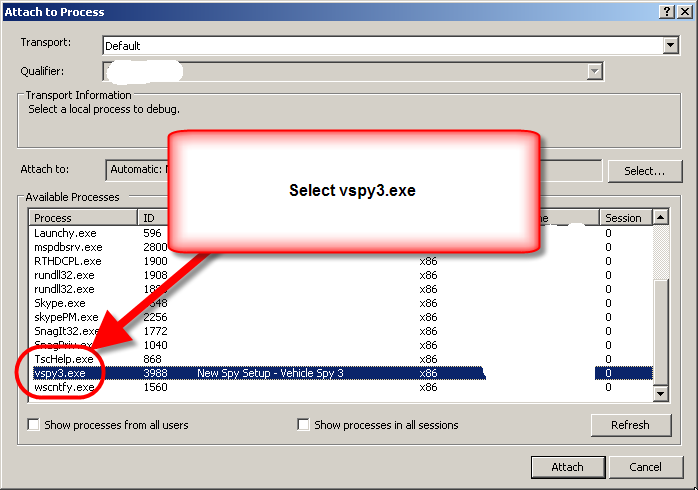
Step 2 of attach to process - select vspy3.exe - make sure Vehicle Spy is offline!

The Visual Studio debugger in operation.
Common Mistakes for Building your project
1) You created a event function but did not implement it in SpyCCode.c. This causes a linker error. Make sure to copy the C function from the Event Code tab in the edit dialog for the C code module.

A linker error will occur if you setup an event but don't implement the function in SpyCCode.C
2) You try to build the project while Vehicle Spy is online. The project is loaded. Go Offline in Vehicle Spy and then build the project.

A linker error will occur if you build and Vehicle Spy is online.
What's going on behind the scenes
For non-windows programmers, please skip this section. Otherwise, read on to learn how the C Code Interface interacts with Vehicle Spy.
One benefit of the C Code Interface is the complexity it hides from the user. But behind the scenes, the C code project is a WIN32 DLL project which is dynamically loaded by Vehicle Spy. The DLL exports a set of standard functions, which Vehicle Spy calls to make everything work.
A key function Vehicle Spy calls in the DLL is the Init function. In this function, Vehicle Spy passes a table of function pointers to the DLL. In this table are the addresses of all the Direct APIs the DLL uses to communicate to Vehicle Spy. The DLL stores these addresses and calls them as needed until unloaded.
The next important function is the CM_RegisterCallback. This function is called by the DLL code to inform Vehicle Spy of all the dynamic callbacks. The CM_RegisterCallback function calls are inserted by Vehicle Spy when it generates vspy.c and vspy.h.
For more information, please review the files in the C code Project in Visual Studio.
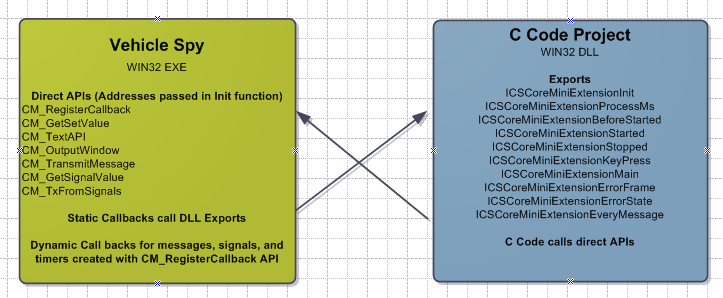
The C Code Interface creates a WIN32 DLL project and function addresses are passed between Vehicle SPy and DLL for communications
Usage in other environments than Visual C++
The result of the C Code Interface is a DLL that plugs into Vehicle Spy. This DLL exports specific event functions and makes call back functions to Vehicle Spy. Therefore, any environment that can create a true win32 dll would work. However, in interest of support, we only officially support Visual C++ 2008 and above. Please contact our tech support if you wish to have this changed in the future.